
Video Review

Table of Contents
The Camera

Blackvue became noticed in 2012 with the DR400-G. The first high quality, well designed dash camera (here’s our review). Compared to other cameras it was sleek, cylindrical and accented with sexy LED lighting. The Blackvue DR650-2CH “Cloud Edition” is the latest evolution and is now tailored for the North American market.

It’s one of the few dash cameras without a LCD screen. You’ll need to use the desktop program or iOS/android app to control any of its settings. The second rear camera connects using a slim coaxial cable for easier installation.
Blackvue’s recently launched “Over the Cloud” features allows users to view videos, live stream video and GPS location over the Internet. This requires you to hardwire your camera and buy a mobile hotspot or use a nearby wifi connection. For most users especially in North America we don’t think this will be of use. We talk this more in the “Blackvue Cloud” section.
There’s also an optional, internal facing camera which illuminates your passenger compartment at night with invisible infrared light. Great for Uber/Taxi drivers to document passenger interactions.
Specs
| Blackvue DR650GW-2CH | |
|---|---|
| Date Released | August 2014 – Cloud Edition: Late 2015 |
| Max Resolution | Front: 1080P@30FPS Rear 720P @ 30FPS |
| Processor | Unknown |
| Image Sensor | Sony CMOS 2.4M pixels, Rear – 1M |
| Lens | “Secret” |
| Capacitor // Battery | Capacitor |
| LCD | None |
| Diagonal FOV | Front: 128° Rear: 129° |
| GPS | Yes |
| Wifi | Yes, N-Speed |
| Bitrate | 6mbps // 2mbps (Front/Back) Non-Cloud 8mbps/2mbps |
| Memory Type | microSD |
| Operating Temp | -20℃ ~ 60℃ |
| Size | Front: Black 118.5mm x L 36mm Rear: Black / W 67.4mm x L 27.6mm |
| Weight | Front – 120g // Rear 30g |
| SD Cards | 16/32/64/128gb |
| Power Consumption | 4.8W |
Packaging

The unboxing experience was luxurious. It’s double boxed for protection. The outer sleeve provides additional protection and country specific labelling.
The outside cardboard sleeve which holds a thicker cardboard box.
Thin cardboard lid which exposes the cameras
The Accessory boxy with a convenient hole for easier removal.
Inside you’ll a thicker cardboard box. Lifting the cardboard lid it will expose the front and rear cameras. Custom cut foam securely holds the cameras during shipping and presents a striking first glimpse at the cameras. Below you’ll find a box with your accessories inside a snugly fit box.
Accessories

As expected the accessories are well made. The power cable is longer than most at 12.5″ and allows larger vehicles to hide their wiring. The ferrite coil which reduces radio interference is slim and mobile making installation easier.
There are many extra accessories including a microSD reader, wire clips which to secure wiring and a microSD card reader. The reattachable lens protector is quite helpful in protecting the lens if you need to move the camera.
Blackvue only included one extra set of mounting pads for the front and rear cameras which was a little disappointing. Still, for most owners this shouldn’t be a problem as you’ll rarely need to move the camera if ever.
Build Quality & Design

The camera has a sleek design. Construction was quite good. Since this is one of the more expensive camera we’ll nitpick a few things.
Compared to the previous version, the camera now is molded from a black plastic for increased discreteness. When tapped it sounds quite solid. When pressed I didn’t notice any creaking. I’m pleased with the stiffness of the camera.
On one side you’ll find the proximity sensor which activates emergency recording on the camera. It’s hidden behind a well fitted translucent sheet of black plastic. To my knowledge Blackvue is the only company which has this feature.
If you look closely the two plastic pieces forming the camera body don’t line up properly. It’s a small detail but a little disappointing for a premium camera. Many cheaper companies have better precision. As well the cut vents have a faint impression from the molding structure.
Connectors & LEDsBlackvue decided to use a coaxial cable to connect the rear camera compared to a USB cable. It’s thinner but still feels quite robust. You’ll have to be careful during installation as small pin out connector can be damaged if mishandled. This is not covered under warranty as it’s considered physical damage.
Besides the status LEDs there are two larger security LEDs. One faces towards the front and warns other drivers/pedestrians that a camera is recording. By default it’s always flashing while on. This feature is not liked by many drivers but luckily it can be disabled.
The other LED is found on the rear camera facing inwards. I found it a comfort looking out the back to see that my camera is working. It’s the right brightness to be visible during daylight and avoid blinding you at night. The rear camera is also quite small and won’t obstruct your vision.
Installation

Installation is more complicated because of the rear camera. Normally the lazy or indifferent can leave the wire dangling and be finished in a few minutes. The DR650 requires a connection from the front to the rear of your vehicle. You will have to spend more time managing your cables to avoid tripping passengers.
A Second Wire Adds 15+ Minutes of Installation TimeThere’s no set way of running wiring as each vehicle is different. You will have to examine your own vehicle and devise your own solution to hide the cable. You shouldn’t need any tools but a soft plastic spudger could be helpful in tucking in wires.

On my own vehicle I tucked the cable in along the headliner. The 20′ was more than long enough to connect the camera in my small Honda Fit and most passenger vehicles. Longer lengths are available for trucks or large commercial vehicles.
Hatchbacks adds another layer of difficulty because of the mobile rear window. You’ll need to leave extra slack in the wire which is harder to hide. I haven’t yet found a good solution that doesn’t require taking apart the hatch.
Everything Else Is FastInstalling the front camera is a simple matter of removing the tape cover and pushing the mount against the windshield. The quick release mount holds the camera in place and allows for secure adjustments by rotating the camera. The 360° rotation allows the camera to be properly position in vehicles with flatter windshield like semi-trucks.
Finally the camera only requires one cigarette power connection. If you want to wire two cameras you’ll need a “power bar” extension. You’ll also need a longer power cord as most included are too short to reach the back.
Installing the IR Module
Installation is much easier because the IR camera can be installed underneath your rear-view mirror. It’s an easy to reach location to ensure it has a good view of all passengers in your vehicle.
I would recommend purchasing the optional IR cable from BlackboxMyCar as the shorter length makes it both easier to hide the cable. As well the double right angle cable makes it easier route. Otherwise you are left with the default 20’ cable to hide somewhere in your vehicle.
Ease of Setup

The DR650 is unlike other cameras. Changing settings must be done from your desktop PC or smartphone. There’s no LCD screen or buttons which control the device other than emergency recording and WiFi.
When you first receive the camera it’s ready to go. The SD card was already inserted. Upon startup it will detect the blank card and format it for operation. This also loads the computer program which is used for setup and video playback.
The camera is also smart enough not to format cards with other existing data. It’ll give you a verbal warning and let you decide if you wish to manually format the card. It’s a simple operation, just hold down the WiFi button which doubles as the format button. In a previous update [Add Link] the DR650 can now accept 128GB cards.
Desktop Software
To use the desktop software you can take out the SD card and insert it into microSD card reader provided with each camera. This is a simple process and is much better than the Mobius camera we reviewed before which requires you to hook up the camera [add link].
Inside after clicking the gear option it’ll reveal the rest of the settings. The interface was well done. All the options are plainly described, you will have no problems using this camera.
Smartphone App
Accessing the camera through the iOS/Android app is more complicated. For most users the main way to control your camera will be through WiFi. Once you switch to the camera’s internal network you can access everything from videos to settings.
I don’t think most people will find it a challenge to use the app. My biggest gripe is the lack of security. By default Blackvue uses one common password and WiFi is enabled by default. Since the cloud update WiFi is left on instead of being disabled after a set period of time.
I’m concerned these default settings may give strangers access to your videos. The app does not prompt you to change the password. I would bet the majority of cameras are opened to anyone who walks by during parked recording.
The cloud features require you to use a mobile hotspot or available wifi network. See the cloud section for details.
Tips – What Options to Change
1) Set the timezone.
The default timezone is GMT-0 (London, England). When you correctly set this it’ll sync with the GPS system and automatically update the time and date. As well in recent updates daylight savings is factored in if the correct country is chosen.
2) Decrease G-Sensor Sensitivity
The sensor is quite sensitive. If you keep it at default values you’ll find your camera is filled with locked clips.
3) Change the WiFi Password
As WiFi is left on by default you want to make sure it’s changed so that no one can access your files. Especially most important if you are leaving your camera on in a parking lot.
4) Turn off security LED.
This is the LED which flashes when your camera is recording. This could give away to other drivers or police that you have a dash camera.
5) Turn off the “Power On” alert.
This still gives you a voice message when your camera successfully records but removes the long welcome message “Blackvue for your safe driving”.
6) Optional: Downgrade your firmware for better Video Quality.
Choose the non-cloud 1.009 version to increase video quality to 8mbps/3mbps (Front/Rear) from 6mbps/2mbps. Download the firmware here and follow the instructions.
Daily Use

In this section we consider how easy it is to do the basic functions we think are important in a dash camera. Blackvue has done a great job since 2012 when it first appeared in the North American market.
Audible Notifications Done Right
In our opinion the most important element is knowing that your camera is working correctly. Most manufacturers do a bad job but we think Blackvue sets the gold standard.
Blackvue is one of the few manufacturers to use spoken alerts. These alerts will tell you exactly what has gone right – or wrong – with your camera. The DR650 upon startup only makes a sound once your camera starts to record. On most cameras the camera will beep or chime even if it encounters a problem and fails to record.
When it fails you get a variety of alerts from “missing SD card”, “please check SD card”. The alerts also don’t stop, you’ll hear the voice again and again until you manually turn off the camera. You can rest assured you won’t miss a critical failure. Most cameras don’t make a sound and the written message quickly disappears.
Customized Messages:
Personally I find the audible messages reassuring, I love knowing I have evidence before I drive. Others may get annoyed and want silence. You can also fine tune your camera by turning off specific notifications.
Personally I’ve turned off the first half of the startup message. Before it would say “Blackvue for your safe driving – starting normal recording”.
LEDs
If audible notifications are disabled or you have difficulty hearing you’re left with the LED status lights. There are two on the main camera body for GPS and recording status and a white light bar on the rear camera.
The main body cameras will probably be hidden as most users choose to put it behind the rearview mirror. This keeps the camera hidden but also hides the LED lights. You’ll be forced to crank your head underneath the mirror to check. Not ideal.
The colour system used to indicate status isn’t very intuitive either. Flashing red lights mean the current file is being protected, not that the camera has failed. If everything is OK there will be an solid orange light for recording, blue for GPS. If both are flashing that means the camera has failed. Could be better.
There is one additional LED light found on the rear camera viewable in your rearview mirror. This light only turns on if your camera is recording. Personally I liked this light. It’s the perfect brightness day or night. Unfortunately there’s no way of turning off the LED in the settings, you’ll have to use a piece of tape if you don’t like it.
Blackvue Listens – Mute Changed to Emergency Record
Blackvue has a proximity sensor on one side of the camera. Like a cell phone sensor when it detects nearby movement it activates.
Originally the proximity button was used to mute the camera. From user feedback Blackvue changed this feature so it will instead protect the clip. This must be a recent change as the manual and online documentation still show the button as turning off the microphone.
I like this change. From my research most users use the emergency record to save interesting moments on their drive. Few talk about muting the microphone.
Cannot Face Side WindowsOne disadvantage of the compact tubular design is that it can only move vertically. You are unable to rotate the camera to face the side windows which can be useful to film police encounters.
Motion Detection // Parking Mode
Blackvue also sets another gold standard in parked recording. Motion detection mode saves space by recording only after detecting movement or if the G-Sensor picks up an impact to your vehicle.
In most camera this feature must be manually activated through the menu and in rare cases a dedicated button. Blackvue automatically enables/disables parking mode by intelligently using the GPS/G-Sensor to detect if you have stopped moving.
This is one of the few cameras I would recommend for parked recording. few people will go manually turn it on and off. Even worse if you forget to turn it off before driving you will lose footage as the motion detection algorithm isn’t perfect.
Heat resistance is an important factor in parked recording. Your windows will likely be rolled up and air conditioning turned off. Blackvue only has a 60C (140F) rating which is lower than we would like. Other Korean cameras such as the Blacksys CH-100B or Lukas LK7900 have a higher 70C (158F) rating.
Startup Time
The Blackvue takes aroudn 35 seconds to startup. This is more than 4x most cameras and I found myself waiting for my camera to turn on before I could drive.
Video Quality & Raw Videos

The Blackvue DR650 shines brightly in other categories but video quality is much worse than we expected for $350. We accept that dual camera and cloud processing will reduce quality but it can be disappointing for many consumers.
For other reviewers this is where they would suggest to avoid this camera. We disagree. Better video quality will give you a better chance of capturing license plates in hit and run situations. We feel it’s even more important to guarantee your camera will have video evidence for your insurance company. No other company does it as well.
We used a couple cameras in our real life, side by side tests:
A118-C which was our budget, all around camera – reviewed here. Dome D201 which is our current “best video quality” camera – reviewed here. Transcend DrivePro 200, our budget reliable, heat resistant camera – reviewed here.
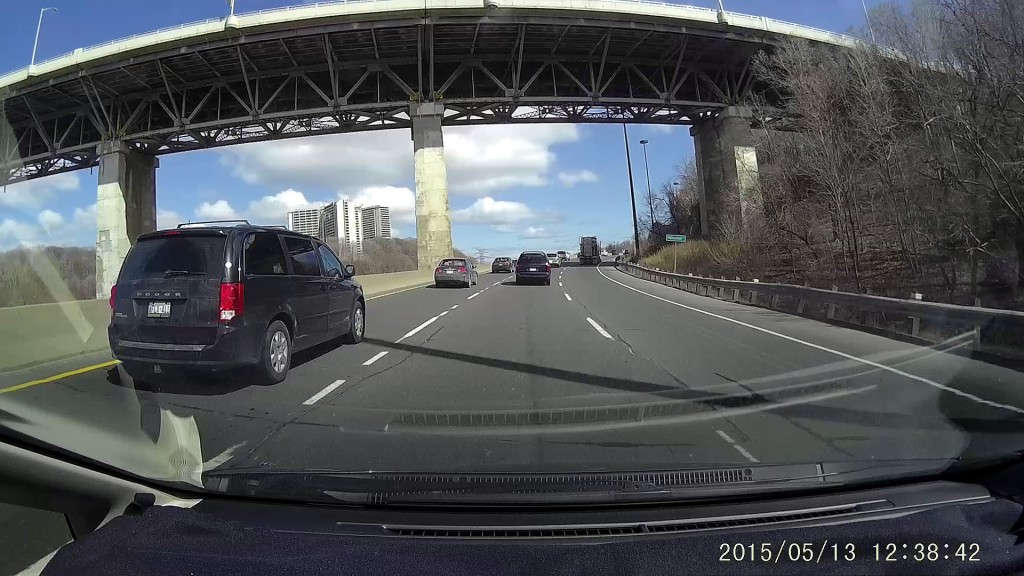
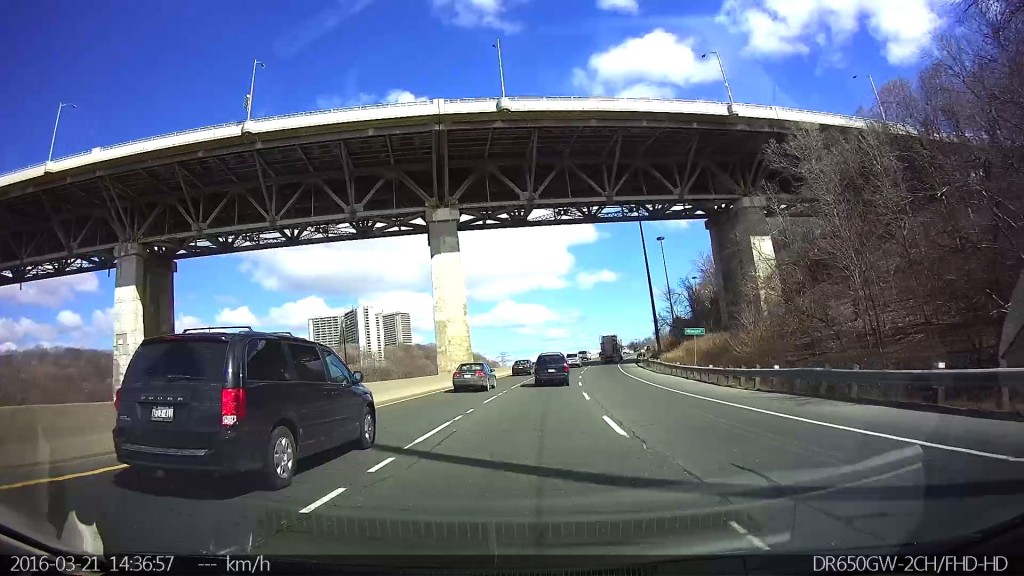
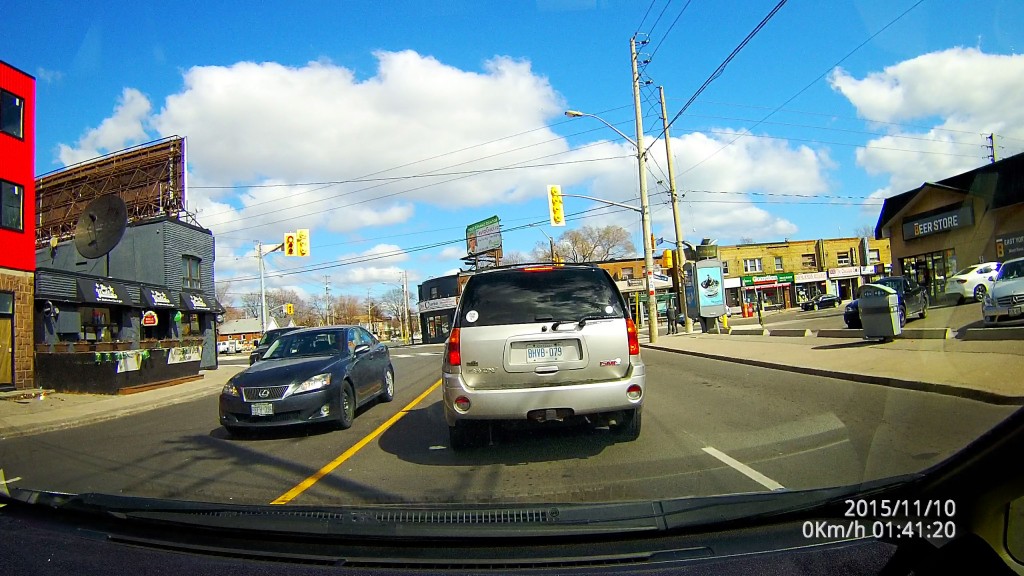
Front Camera – Day Quality
During the day, video sharpness is somewhat similar to other camera but we found license plates were more difficult to read especially while moving. The lower bitrate (6mbps vs 15mbps in other cameras) compresses the image which reduces legibility. This can also cause the video to become pixelated moving in quickly changing environments.
There are some benefits for a lower bitrate. Professional drivers who can use video footage to handle complaints about their driving. You get nearly 33 hours on a 128GB card at its native video resolution
A118C
Blackvue
Dome D201
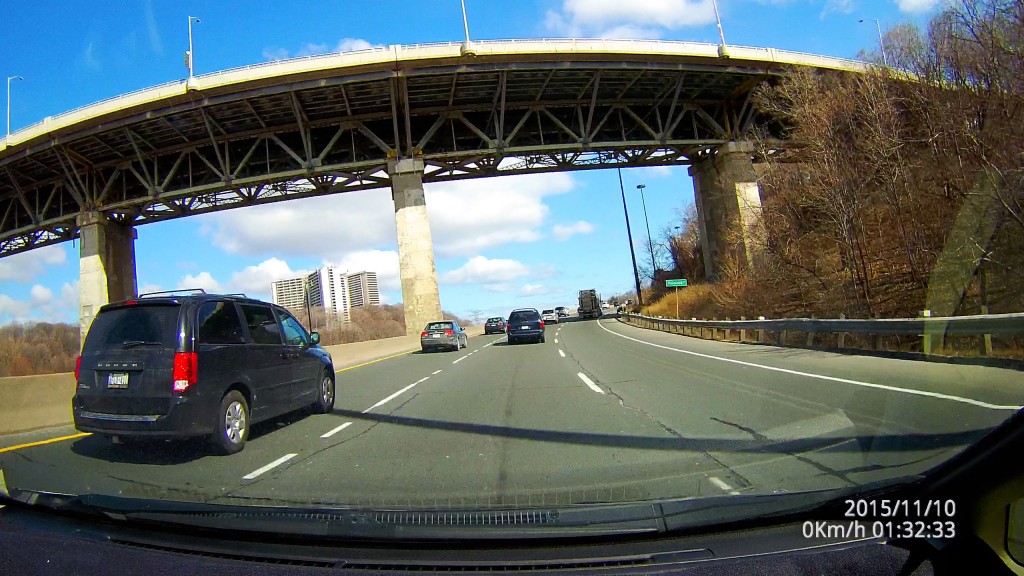
In this image the sharpness is mostly the same. License plate legibility is similar. However if you look at the trees on the edges it’s blurry and lacks detail.
Download Raw Videos: A118 – Blackvue – Dome
A118

Blackvue
Dome
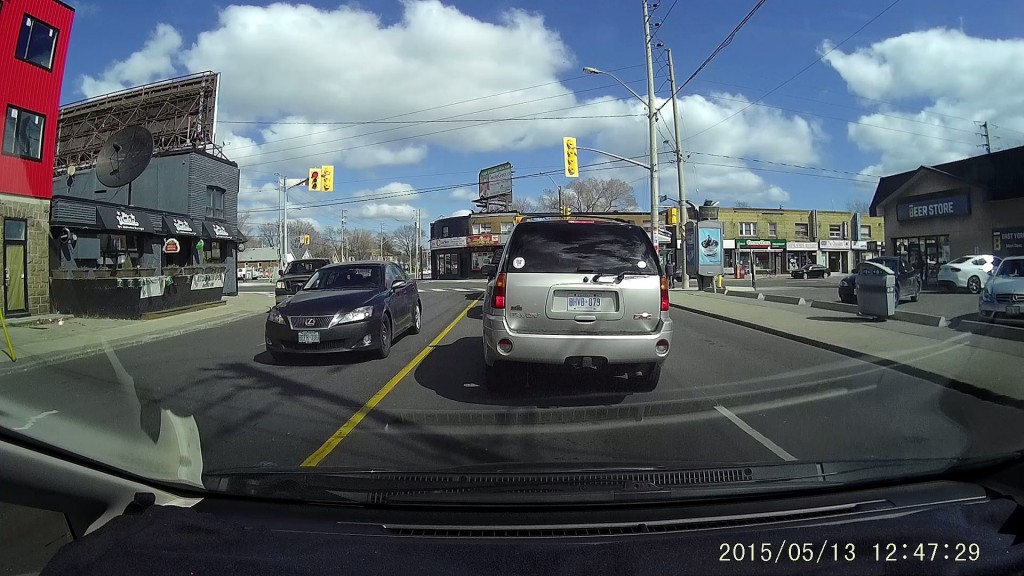
If we look at this series it’s more difficult to read this license plate.
Download Raw Videos: A118 – Blackvue DR650 – Dome D201
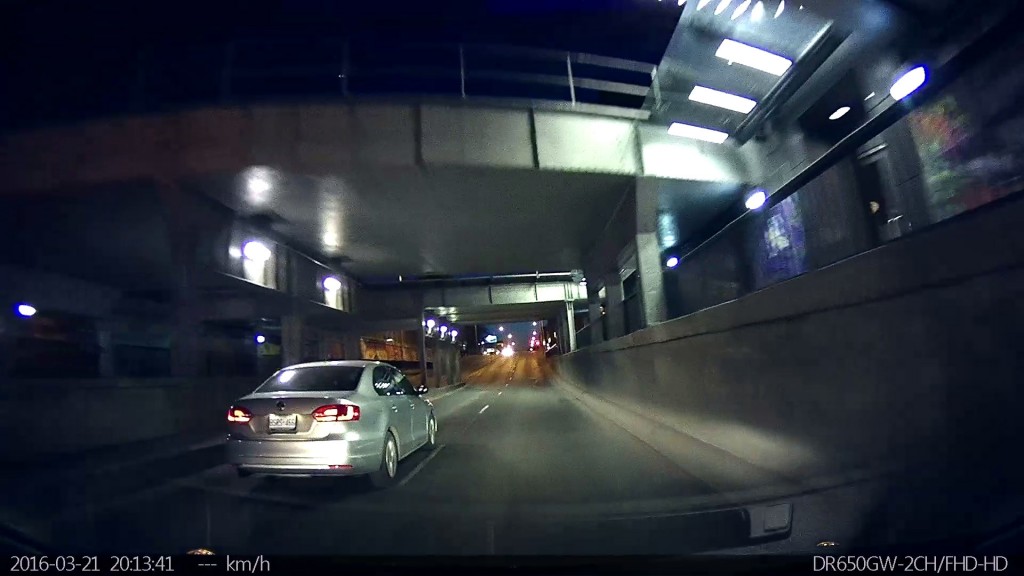
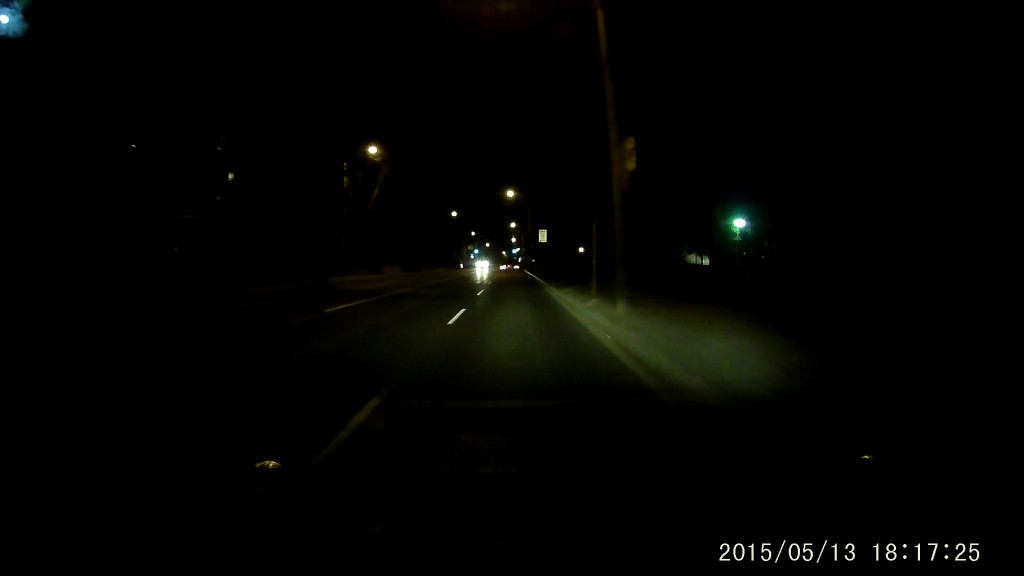
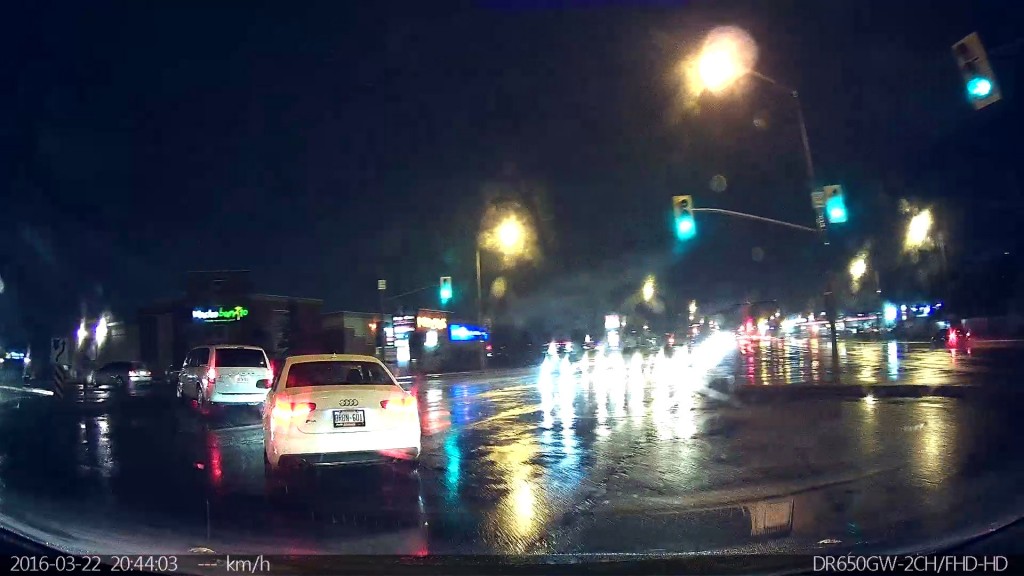
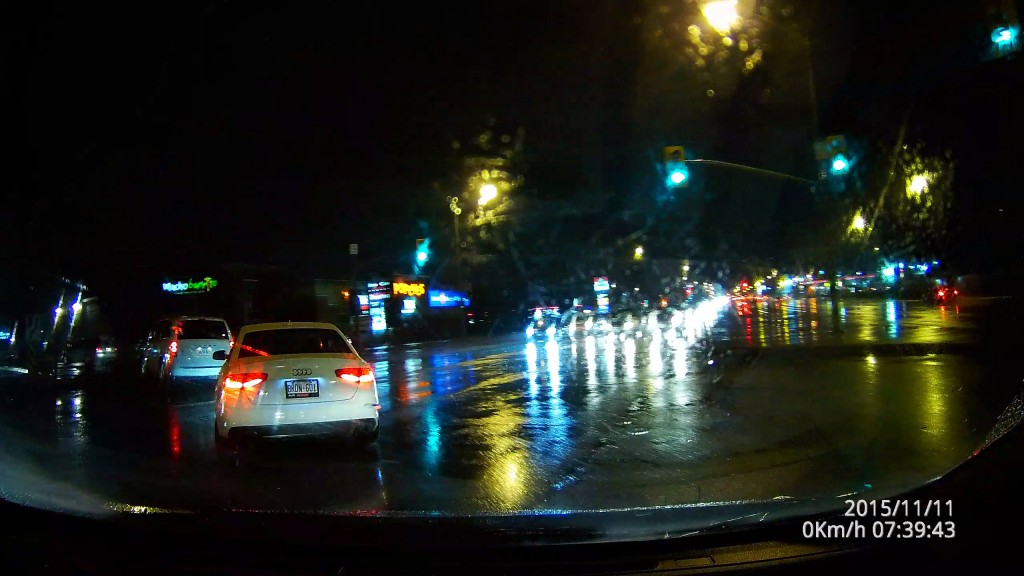
Front Camera – Night Quality
At night, quality is again reduced. The DR650 missed capturing license plates in situations where much cheaper cameras could. It doesn’t help that High dynamic range processing is enabled. This is supposed to increase clarity in strongly contrasting light. Our experience is that it doesn’t help and only reduces sharpness. We did notice an increased sensitivity in low light. You’ll see much more compared to cheaper cameras.
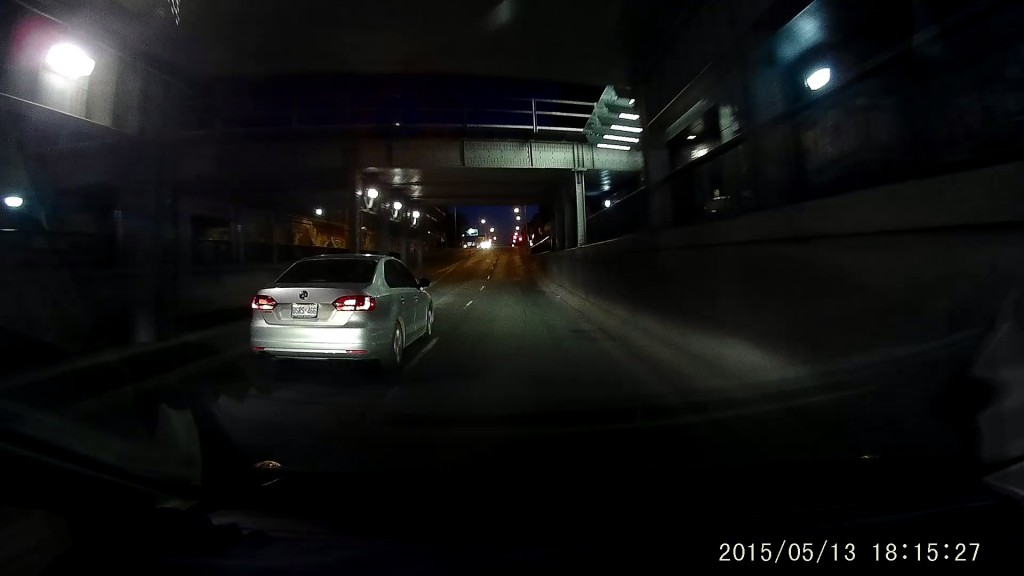
A118 // B40
Blackvue
Dome
Shows off Blackvue’s low sharpness, high light sensitivity. Compared to the A118-C you can’t read the license plate. Blackvue is able to show more of the scene outside the illuminated cone on the A118.
Download Raw Videos: A118 – Blackvue – Dome
A118C
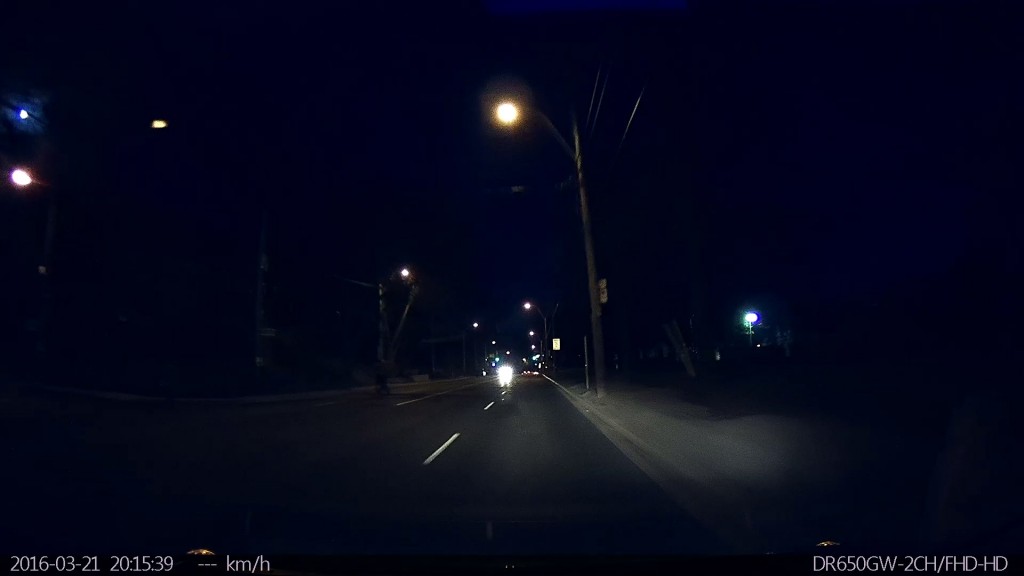
Blackvue
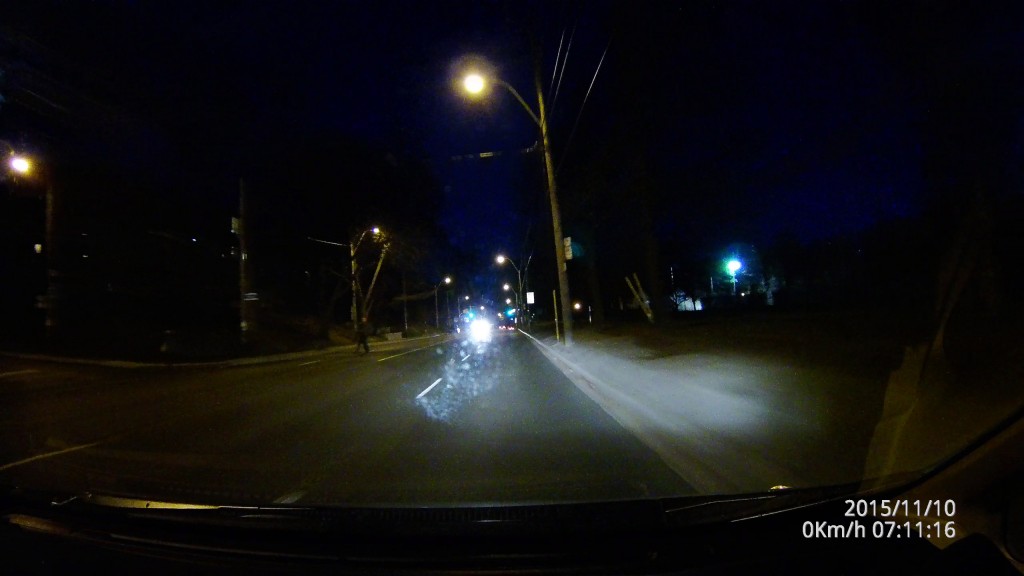
Dome
Showing again the benefits of increased light sensitivity. You can clearly see the pedestrian which may provide you better evidence in case of an accident. You can see what actions they were taking for example if they intentionally threw themselves into traffic.
Download Raw Videos: A118 – Blackvue – Dome
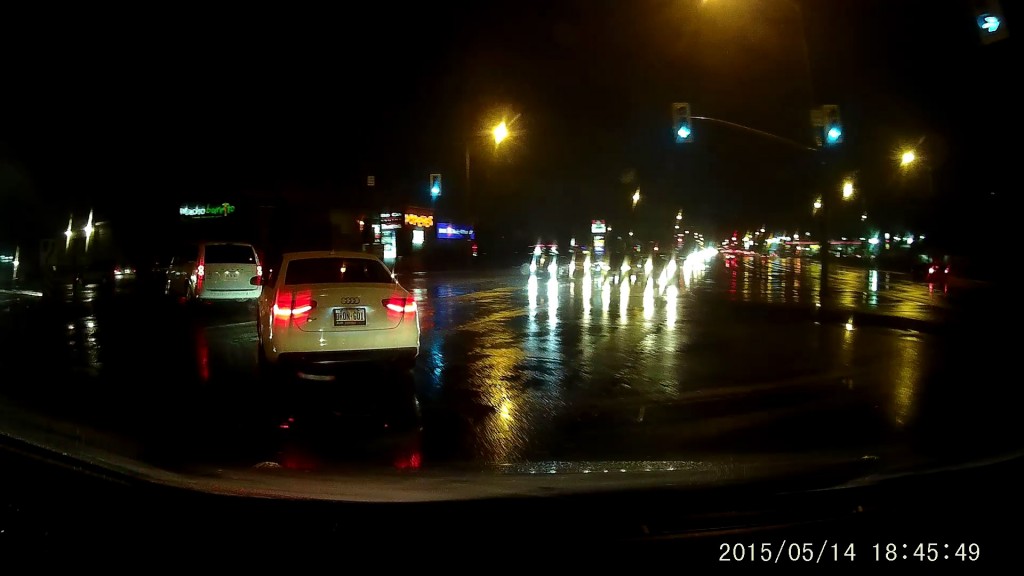
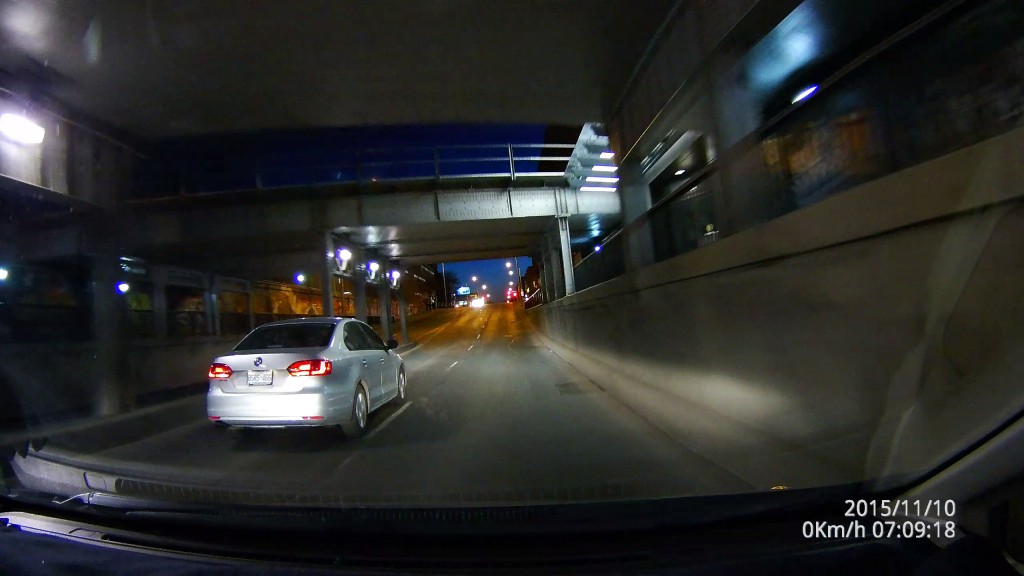
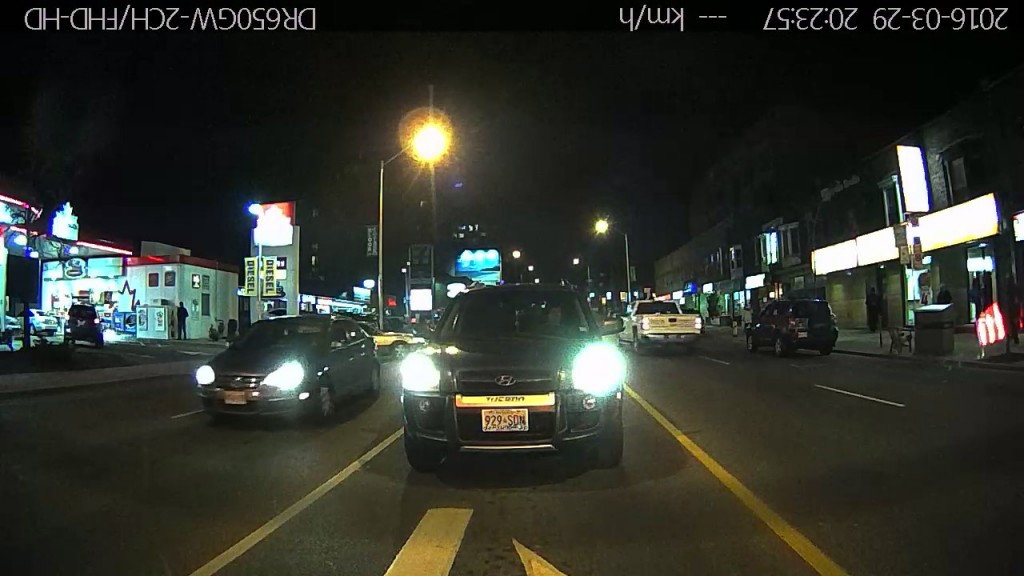
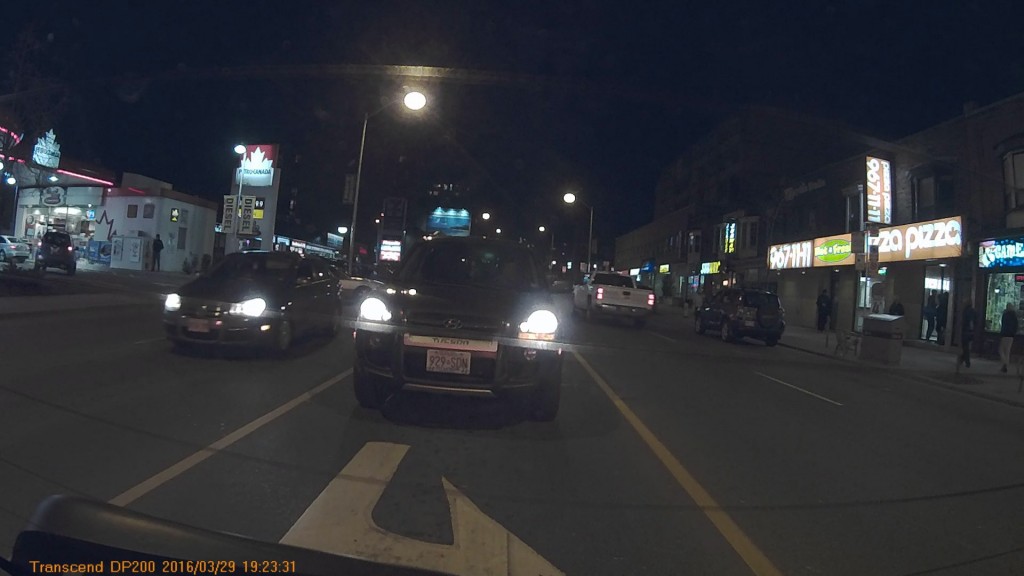
A118C
Blackvue
Dome

Xiaomi Yi
The lowered bitrate on the DR650 may change the license plate. Here a “D” becomes a B. Every other camera including the budget A118C successfully rendered the plate.
Download Raw Videos: A118 – Blackvue – Dome – Xiaomi Yi
Rear Camera
The rear camera is grainy and has much lower dynamic range than even the Transcend 200 (our pick for budget, reliable camera but with poor video quality).
Blackvue
Transcend
While the license plates are about the same the signs are mostly unreadable and blown out. The sensitivity found in the front camera is reduced making it difficult to see the darker parts of the image.
Infrared Camera
The infrared camera comes equipped with a light sensor so it will only activate the IR lights when it’s adequately dark. They are also correctly pointed at passengers. Older cameras such as the DVR-027 shine the IR outwards toward the front windshield which does nothing but add glare
Firmware – Cloud Version Reduces Video Quality
Firmware updates are easy to find on Blackvue’s website. Not mentioned is the cloud version 2.000+ firmware reduced the video bitrate from 8mbps/3mbps to 6mbps/2mbps. You can downgrade to the older version. The procedure is simple but it does risk bricking your camera (rendering your device non-functional).
Blackvue Cloud & Mobile App
The Blackvue Cloud is the software that Blackvue has been pushing. You camera can connect to the internet and stream live videos, send your location in real time, alarms, download videos, radio and more.
Blackvue knows it’s more difficult to compete on features and has turned to software to hold their competitive edge. (Interested in this topic? Listen to the podcast by Andreesen Horowitz on how “Software is What Distinguishes the Hardware Winners”)
Blackvue has a great video covering the Cloud System. You can also see their website for more details.

Painful Setup & Costs
We’ll be covering the cloud in depth in another article. Our current thought is the benefits of clouds are unattractive due to the difficulty and price of installation and setup.
First you’ll need to hardwire your camera to your car’s battery. While there are premade kits you’ll still need to access your fusebox and have some knowledge of wiring.
Next you’ll need a mobile hotspot if you aren’t lucky enough to have WiFi coverage where you regularly park. In North America this can cost at least $50-$60/month for a reasonable amount of data. Europe is much cheaper. Still you’ll need to hardwire this device into the fusebox.
Cloud for Consumers
For the average consumer we don’t see much benefit. It’ll provide a live view of your vehicle. Maybe from the push notifications you can run out to your vehicle if it gets hit. But what can you do then except rush to your vehicle? Perhaps you can find the culprit before they leave.
Perhaps parents can keep track of children? I have a feeling this will be a very small segment of the market.
Cloud for Business
For smaller fleets there may be some benefits to live GPS tracking. We feel the consumer-first interface makes things difficult. You would probably be better off with a Trackimo device which provides much cheaper tracking.
I’ve read that there’s some interest in viewing the scene of an accident and perhaps Blackvue’s cloud would be most valuable in that instance. We can’t conclusively say if there is good value as we don’t operate a small fleet of vehicles.
For larger fleets there have better management systems than relying on consumer grade solutions.
Reliability
Looking at reviews over one and a half years the camera has an excellent track record. Blackvue used to have problems with overheating cameras back in 2012. I have seen few reports of overheating even with their popularity in hot countries such as Singapore.
Part of its reliability in hotter climates comes from using a capacitor (vs a lithium ion battery) Still it has a lowered 60C temperature limit. Other Korean cameras can go up to 70°C (158°F). This reduces its reliability in parked recording especially during the summer months. A car’s functions as a greenhouse and could damage the camera.
Warranty & Customer Support
Blackvue comes with a 1-year warranty but any support will primarily come from your retailer. There’s no office or main distributor who handles exchanges. Be careful as there are many sellers who sell grey-market units. These are authentic cameras but are not covered by warranty in the purchased country (ex. Cameras marked for Korea but sold in USA)
Blackvue used to be plagued with unauthorized retailers selling on Amazon but that has largely been handled. Still, check Blackvue’s authorized retailer page before purchasing. We recommend purchasing from BlackboxMyCar for Canada // USA.
Summary
The Blackvue DR650GW-2CH is our pick for best general dash camera. The camera is easy to use while having deep customization options for power users. The voice notifications are our favourite part of this dash camera. It will help ensure you are always protected.
Video quality is the worst element of the DR650. There is reduced sharpness and dynamic range compared to cheaper cameras. But, light sensitivity is quite good. You’ll be able to capture more of the environment which gives you a clearer image of what actually happened.
While we would rather recommend a camera with great video quality & protection, none currently exist on the market. By recommending the DR650 we feel we will reduce the number of drivers who miss that their camera has failed and be left unprotected. It will exonerate you in a crash which is the #1 reason to get a dash camera
Blackvue advertises the cloud features as an important feature. For most North Americans this is highly impractical due to cost and complexity of setup. The lower 60°C operational limit makes parked recording difficult in many parts of the country. In Europe/UK, data is cheaper and the climate more mild which makes using the cloud more practical.
Blackvue has an optional Infrared camera module which faces inwards and records passengers. It costs an extra $100-$150 on top of the camera. Intended for Taxi/Uber drivers this may be too expensive for their needs. Yet, there’s a case to be made for having premium protection in case of lawsuits, assaults, etc.
| The Good | The Bad |
|---|---|
|
|
Where to Buy?
Be sure you’re purchasing from an authorized retailer. See the official page if you are unsure.CANADA / USA
I recommend BlackboxMyCar. The owner Alex is passionate about dash cameras and cares about his customers. Use coupon code “CARCAMCENTRAL10” during checkout for $10 off any purchases over $80. Go to BlackboxMyCar.Com
Alternatively they have an Amazon USA store
United Kingdom
Get it from Amazon.
Disclaimer:
We purchased the DR650GW-2CH at a discount from BlackboxMyCar. They did not pay us for this review. Our opinions are our own.
Using the above links give a portion of your purchase to us. Costs you nothing and helps support our work.
Can the optional IR camera be added to the DR430-2CH like it can with the DR650S-2CH IR? If so, is there a guide and is the IR camera sold separately or with the 430 cameras?
Hey Anon, I’ve contacted Blackvue and I’m waiting on a reply from them.
Thanks for inquiring with Blackvue. I have a followup question while we wait for a response from them. If the IR camera is connected, can the rear camera also be connected? In other words, can all three cameras operate at the same time or is it either the front camera with the IR or rear camera? Is it different for the DR430-2CH and DR650S-2CH IR cameras? Thanks.
Thanks for reminding me about Blackvue. They haven’t replied. I reached out to Alex at BlackBoxMyCar he says the 430 does not work with the IR camera. On either camera you can only have one camera or the other. No third camera. You would have to do a separate installation.
Andrew great review! Can the IR camera be rotated rear facing while driving and interior while parked for extended periods, eg. airport, for security purposes? Thank you!
Clint
Hey Clint, yes, it rotates 360°. I keep forgetting that an IR light can be used in very dark parking lots for surveillance. However if it’s for extended periods your battery will drain after a day of recording (if I remember my calculations correctly), less during the winter.
Bought a DR650 – 2CH based on this review and only have one problem.. For the life of me, I cannot get the internal mic to work. All recordings show as “NO MIC”… The sensor on the left of the unit only initiates Manual recording and there is apparently no control of the mic audio… I can also find no settings to enable / disable the internal mic.
I’ve tried updating the firmware to no avail.. Just no audio option..
An I missing something really obvious?
Hey Steve, have you checked the settings menu in the computer or smartphone app? There’s a place to enable/disable the microphone in the menu under the “voice recording” setting. I’ve taken a photo of it here: /static/picture/Nn52tkZ.jpg
Great site and reviews! Thank you, Andrew!
I’m about to purchase the BlackVue DR650 for $299us from a site called MassDrop. The only thing that might be a problem for me, is the temp range. Living in Southern California, it can get hot here. Should that deter me from buying this cam? Is the issue it won’t record when parked and the temp goes above 60c? Or, will the heat damage the camera such that it will fail to function at all after exposure to heat?
Thanks again!
Hey Mike, thanks for enjoying the content! There’s no problems, Blackvue likes to rank their cameras a little conservative but out of all the companies they had to deal with significant overheating problems back in 2012. That impacted all their subsequent designs and there’s been no problems even in hot and humid countries like Singapore where Blackvue is a favourite. You’ll be fine and Massdrop is a great company.
Hi can you help me view maps on my smart phone. This first video captured after installation showed a split screen with video and moving GPS position I am guessing I adjusted the option somehow and this mapping view has diassapered leaving half a blank screen with the video playing at the top
Hi Judith,
I just realized I might have the same problem. The blank screen is on the bottom half right? Looking at my past videos I’ve never had a working map. This may be better visualized on your laptop or computer unfortunately. I’ll try reaching out to my contact tomorrow to see if there is a solution.
can you help me to trouble shoot my Blackvue cam?? It stops recording and when i started my car : it says “SD card problem” , will not record
what should I do?????
I inserted a new card and still not working
please help!
Hey Raymond,
Sounds like your SD card has failed or it has a formatting error. Try sticking it into your camera first and holding down the WiFi button for 10 seconds. After hearing a beep release your finger and it’ll try to format the card. If it works, great, if not there is a chance your card has failed.
Your card will fail eventually as it’s a wear and tear item. I’m creating a guide soon but I would recommend getting a card like the Transcend or Sandisk High Endurance line if your SD card has failed. These are specifically designed for dash cameras and are made using the MLC process (multi level cell) versus the cheaper TLC (triple layer cell) construction used for most SD cards.
MLC generally lasts 3-6 times longer.